- Published on
- Last updated on
- Last updated on
Installing and configuring TrueNAS Scale for home use
- Authors

- Name
- Daniel Demmel
- Occupation
- Software engineer with
21 years of professional
experience
Motivation
This is a follow-up post to Build a cheap but fast home NAS system in which I wrote up how to find some great hardware for a home server.
But why would you want a home server? For me it started with just wanting to store and share photos, videos and music with flatmates (and later family), so the first device I got – the Linksys NSLU2 (a.k.a. SLUG) – was just simply something I could plug in a couple of USB hard disks and an ethernet cable. But over the years even the cheapest hardware became more capable, so other uses opened up. We could stream music from a NAS directly to an old Apple AirPort so playing music became social on a proper sound system using the AirPort's digital output (no thanks to the overpriced Sonos speakers). Films could be streamed or played from files directly on a big screen (no thanks to TVs, but particularly "smart" ones laden with bloatware, ads and surveillance). But in all honesty, simply just being able to automatically back up stuff from all devices without paying a steep monthly fee – it gets a bit expensive once you accumulate more than a terabyte of data which is very easy if you like taking a lot of photos and videos.
There are myriad of other uses (I'll mention some below), but basically you can replace a lot of cloud services with open source ones and easily have a home server pay for itself within a few months or years, depending on how many services you pay a subscription to. Of course it will also take a bit of time to research, set up and maintain some of these open source alternatives, but they will often be more powerful and more suited to individual / family use cases, because they are usually developed by people who also have the same problem, as opposed to Software-as-a-Service offerings that inevitably end up catering for small business and enterprise needs where the money is.
Anyway, this introduction is getting as long as the ones before food recipes, so let's get some software set up!
Installation
There's a recent and straight to the point video that walks through downloading and installing TrueNAS SCALE as well as setting up pools, datasets and installing an app. I recommend watching it to see all the basics done step by step and then carry on reading below to see the caveats I encountered and how to solve them.
Preparing the bootable install USB on Mac OS
I thought I will be able to use Disk Utility to "restore" a USB stick from the ISO to create a bootable disk (I'm pretty sure it used to work at some point...), but it didn't work for me on Mac OS Ventura. Instead, I had to use dd in Terminal, but if you'd rather use an app, you can download unetbootin.
Configuration
Using a flash drive USB stick as boot device / pool
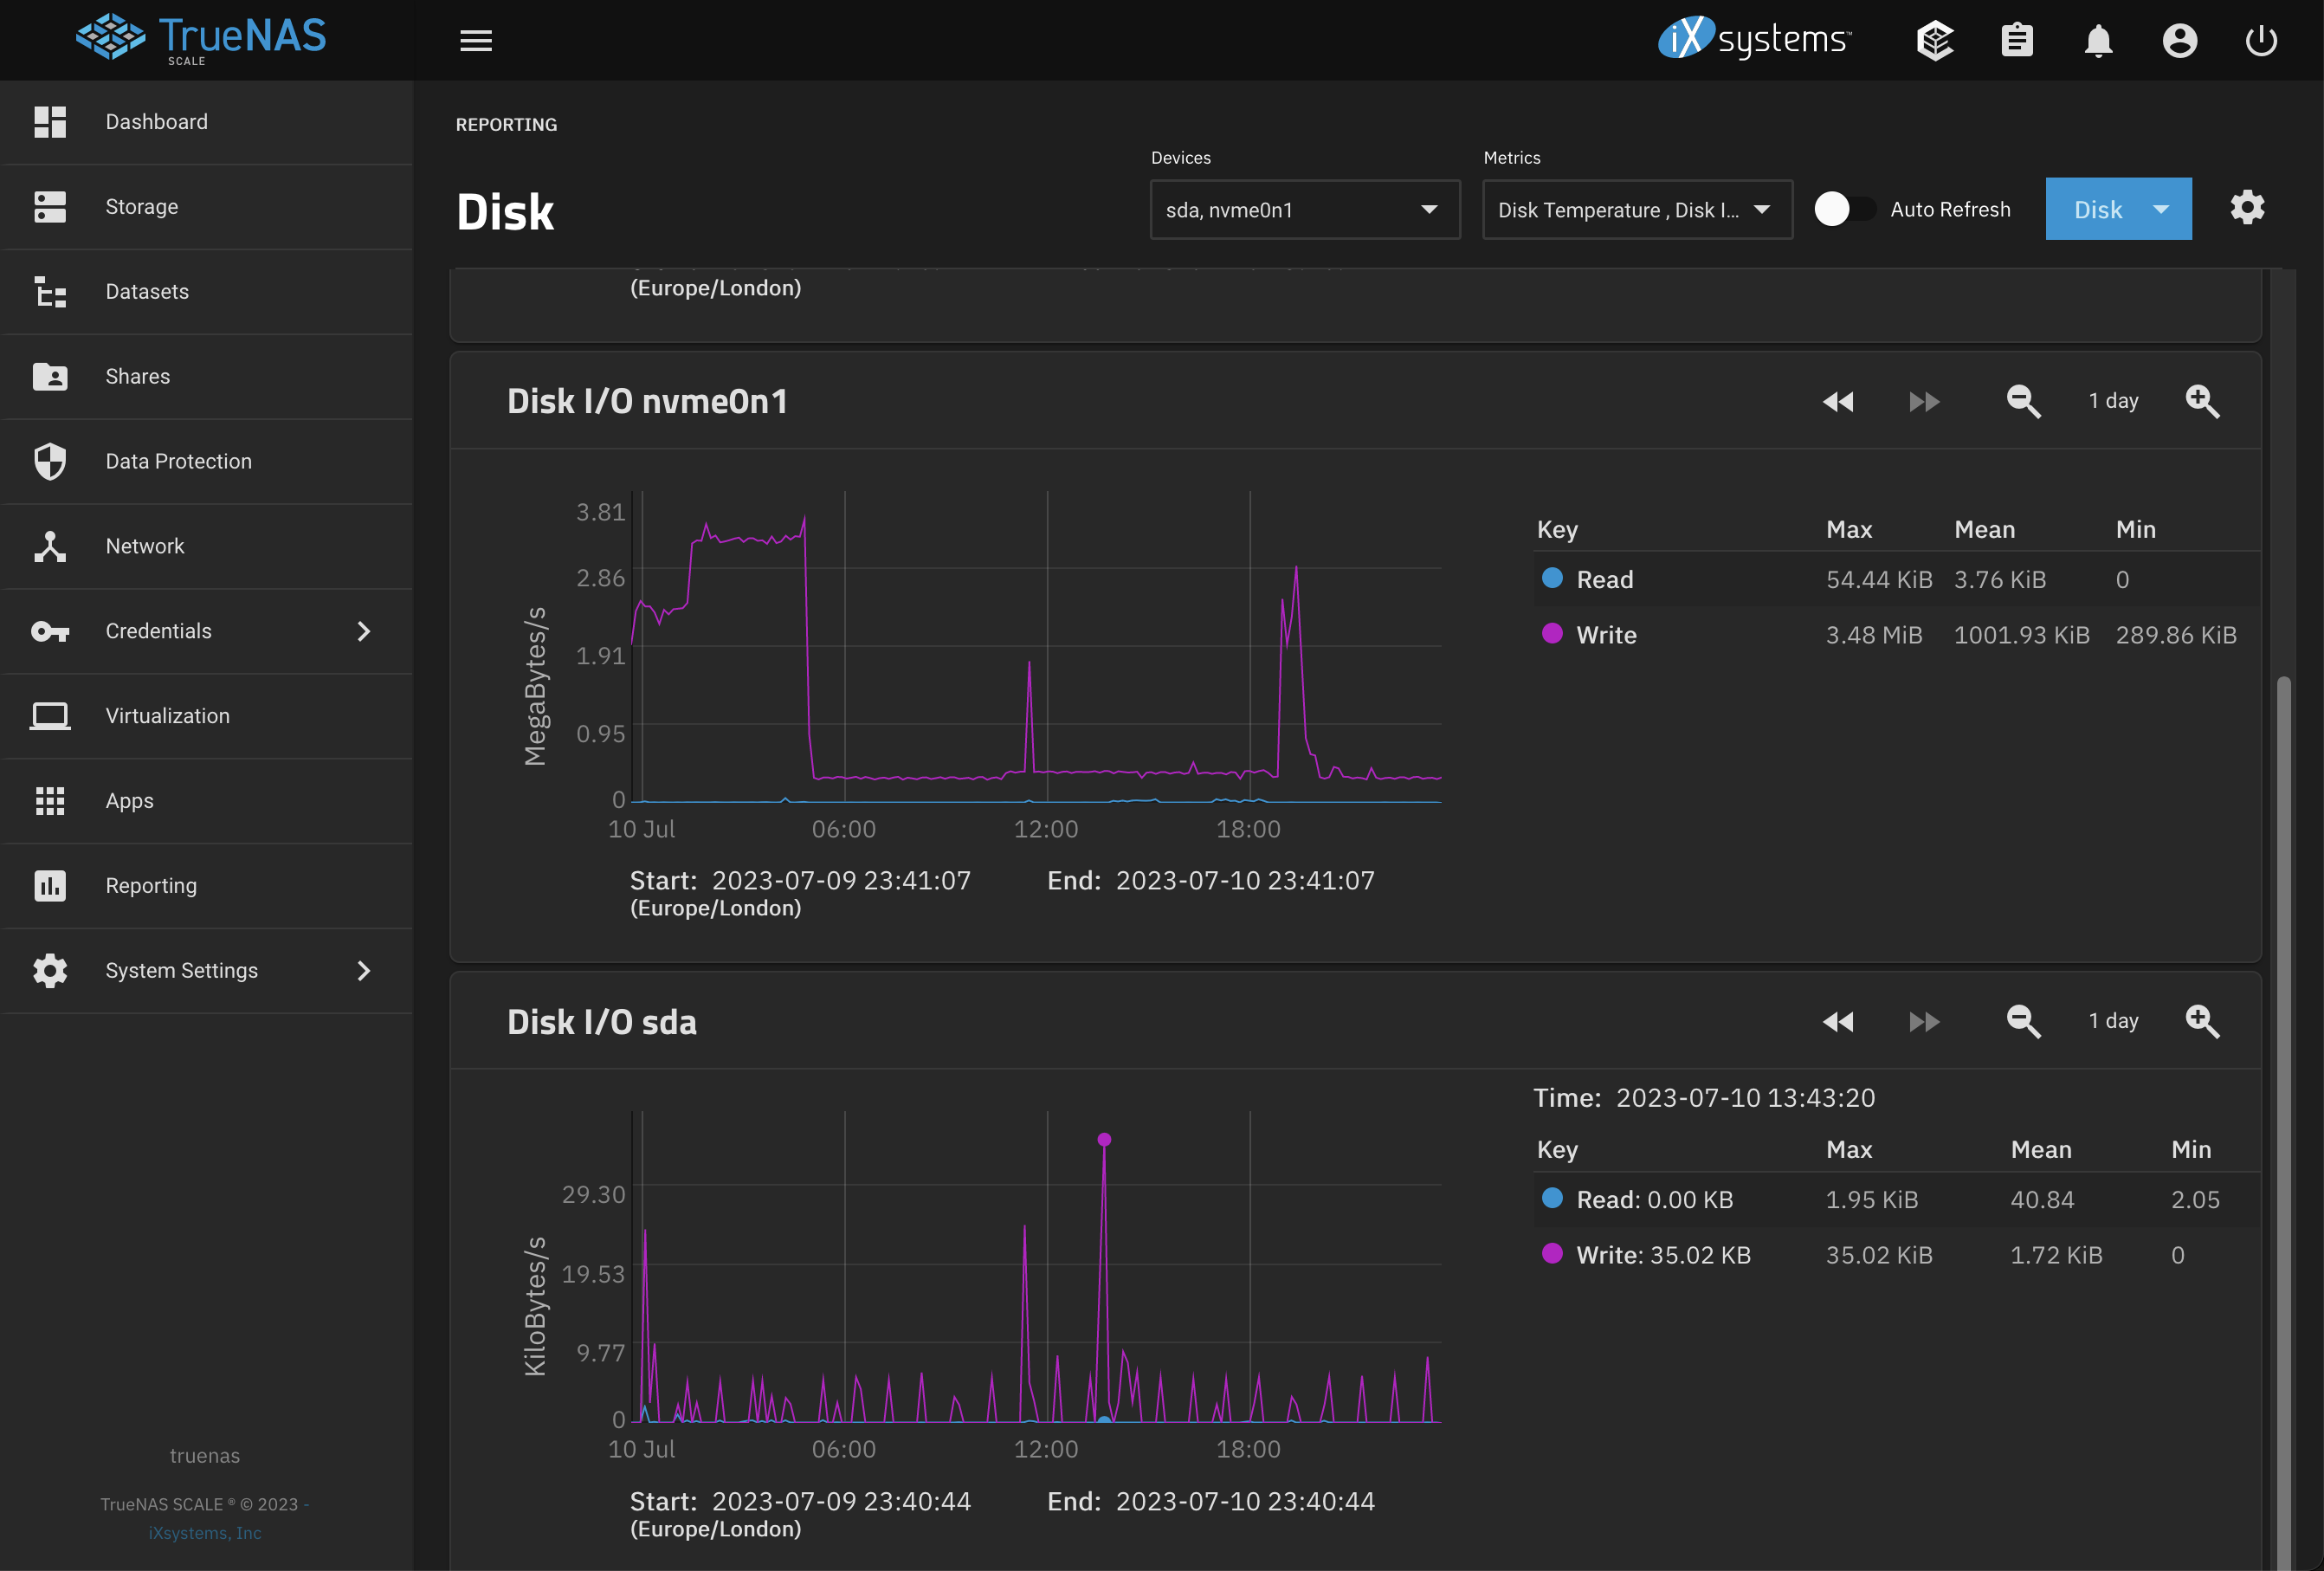
As I mentioned in my previous post about hardware, you'll need a separate disk for TrueNAS to boot from. I chose a tiny flash drive that only has a relatively limited number of writes, so as promised, here is how you can decrease the amount of disk activity to the minimum.
The two main things that would use the boot disk by default are logs and applications, but it is possible to set TrueNAS to store them on the data pool. For app storage, enable System Settings > Advanced > Storage > System Dataset Pool and for logs, set System Settings > Advanced > Syslog > Use System Dataset: Enabled. This way most of the busy writes will happen on the internal SSD so 1) the flash drive write cycles aren't used up quickly, 2) stuff stays nice and fast, and 3) if the flash drive does fail you'll just need to reinstall the OS and restore the config (that you should periodically backup using System Settings > General > Manage Configuration > Download File) to get everything back.
After these settings are in place, you should be able to see that the disk usage on the flash drive is down to kilobytes here and there – have a look at the bottom chart called sda in the screenshot below:
File sharing
Our family mostly has Mac and Windows devices (apart from a Steam Deck and whatever Android is) so to keep things simple to set up, I chose SMB over NFS.
To set it up, make sure you create SMB shares for all datasets. Set ACLs to POSIX Open to not have to worry about permissions – this is not something you should do in an enterprise setting where stuff needs to be properly segregated for various people and groups, but makes things much easier to configure and work if you want to share most stuff with your family anyway.
Migrating files
If you have a previous NAS to copy files from (like I had a Synology Diskstation), create a Rsync module – much quicker than faffing around with SSH, but you need to have the devices on the same network or VPN. To turn the rsync service on, go to System Settings > Services toggle rsync and press the pencil icon on the right to edit configuration. Then click the Rsync Modules tab where you can set up Rsync servers. This has to be done for each dataset.
Now you're ready to push data from your device via rsync without extra authentication and permission issues. Again, of course only do this if your devices are on the same local or VPN network, so definitely don't open the port on the internet.
Apps
One of the best features of TrueNAS Scale is that they made it easy to install and update applications using a small, embedded Kubernetes server (K3s if you're curious) Docker. The apps are defined as Docker Compose templates so even if they need multiple components (like web server, worker, database, etc) you don't need to separately install and configure so that they work with each other. In case you aren't a seasoned NAS user, it's probably useful to clarify that they are "apps" in a sense that you can install them easily, but they are mostly server side, just chugging along in the background doing useful things. So there won't really be a dedicated, native UI to open, but they often do come with a web interface you can access on any device, or even a client app you can download, but that'll be a separate thing.
I'll list a few apps below that I highly recommend, but it's nice to just browse what there is available to install and look them up. I found a lot of new, amazing ones that I had no idea about!
Remote access
A home server (despite the name) is much more useful if you can access it anywhere. I used to have OpenVPN server set up (see my earlier article how to go about it if you're interested), but it doesn't work well if your home doesn't have a public IP and it's a bit annoying having to generate and distribute certificates. Luckily Tailscale implemented the newer WireShark protocol with super easy to use apps, web admin interface and relay servers I can 100% recommend. It's free for personal use and you can share your home server with other users as part of the free package (but you can't have them join the same Tailnet).
By default you'll get a different IP address for each device over the VPN which makes it a bit annoying having to keep changing it to access TrueNAS and apps from home or elsewhere, but luckily there's a solution. You can set up Tailscale Route by making your home server a Subnet Router, just make sure to Approve Subnet on Machines page. I changed my home IP range from the default 192.168.0.0/24 as you can't have it clashing on a different network on a public WiFi or it will just mess up your connection.
Media server
To stream music and videos, I can recommend JellyFin. They have lovely native apps for all platforms and don't try to charge you for apps or show ads like Plex. Of course Plex is more established and has more features, but I'm perfectly happy with what JellyFin offers.
File sync
To replace Dropbox on your devices you can install Syncthing. It uses rsync as file transfer protocol so you get robust, incremental sync. Now all my photos and Obsidian notes are pushed from my phone right away in the background!
Photo library
(Edit: I used to recommend Photoprism, but Immich ended up being a better fit with proper external library support.)
Once you have your photos pushed from Synchthing, you can use Immich to index them and run some machine learning magic to recognise faces, objects, colours, etc, almost putting Google Photos to shame. They don't have such a full featured app as Google Photos to replace as the main gallery app on Android, but having a full quality photo and video backup with a web viewer is already pretty good.
Make sure to follow the installation docs, as there are some tricky bits like having to set up datasets with Apps preset for data and Generic for Postgres.
Ad blocking
Adguard Home
Needs router DNS redirected to it, so can take internet out if you have issues with your NAS, but otherwise very useful to block ads at the DNS level so phone apps are also protected.
Voice assistant (Smart Home)
HomeAssistant
The important thing here too is to use Apps preset for data and media and Generic for Postgres.
Bit limited in the container comparing to full HAOS, but I prefer it for simplicity.
File Browser
TrueNas Scale (as of 22.12 / Bluefin version) does not have a built-in web based file browser. Using SMB shares this is not a massive issue on a computer, but sometimes I just want to have a look at a config file or something on my phone, so I installed File Browser. The TrueNAS repo one didn't want to deploy for me, but the TrueCharts one worked – this is in general a good thing to try. The default user to log in with is admin / admin.
Conclusion
I hope I gave you a good introduction into running your home server with TrueNAS, if you have any questions or comments please post below!